Integrating Google AdMob ads in Kotlin Multiplatform: The Complete Guide

Kotlin Multiplatform (KMP) allows developers to share code between iOS and Android platforms while maintaining native performance and user experience. In this guide, we’ll walk through the process of integrating Google AdMob Ads into a KMP project, covering both iOS and Android implementations.
Understanding AdMob Basics
What is AdMob?
AdMob is Google’s mobile advertising platform that helps developers earn money by showing ads in their apps. Think of it as a bridge between advertisers who want to reach mobile users and developers who want to earn revenue from their apps.
Types of Ads for Beginners
1.Banner Ads
- Rectangular ads at the bottom/top of the screen
- Easiest to implement
- Least intrusive for users
- Perfect for learning
2.Interstital Ads
- Full-screen ads
- Show between natural app transitions
- Higher revenue potential
3. Rewarded Ads
- Users choose to watch ads for rewards
- Highest user acceptance
- Best user experience
Prerequisites
Before we begin, make sure you have:
- A Kotlin Multiplatform project set up
- An AdMob account with ad unit IDs for both platforms
- Basic knowledge of iOS Xcode (requires an Apple Mac computer) and Android Studio development
Project Structure
We’ll start by creating a shared AdMob banner component that can be used across both platforms. Here’s the basic structure:
Create a new file AdMobBanner.kt and add the below code.
// common/AdMobBanner.kt
@Composable
expect fun AdMobBanner(modifier: Modifier = Modifier)
Now Android Studio is going to give you an error AdMobBanner , right click on the error icon and select “Add missing Actual Declaration”. Android Studio automatically generates the classes for iOS AdMobBanner.ios.kt and for Android AdMobBanner.android.kt. Below we will add code to the new files.
iOS Implementation
Create an AdMob account https://developers.google.com/admob/android/quick-start
1. Setting up CocoaPods
First, install CocoaPods if you haven’t already:
sudo gem install cocoapodsInside the Android Studio terminal, enter the following commands. The command creates a Pods directory “iosApp/Pods/Podfile” in your iOS project.
cd iOSApp
pod init
Import the Mobile Ads SDK
The simplest way to import the SDK into an iOS project is to use CocoaPods. Open your project’s Pods/Podfile and add this line to your app’s target.
pod 'Google-Mobile-Ads-SDK'Also add below to Podfile
target 'iosApp' do
  use_frameworks!

  pod 'Google-Mobile-Ads-SDK'

end

post_install do |installer|
  installer.pods_project.targets.each do |target|
    target.build_configurations.each do |config|
      config.build_settings['IPHONEOS_DEPLOYMENT_TARGET'] = '13.0'
      config.build_settings['EXCLUDED_ARCHS[sdk=iphonesimulator*]'] = 'arm64'
    end
  end
end
Install the dependencies:
pod install --repo-updateAdd the AdMob library framework to you iOS project.
Option 1: Use the cocoapods IntelliJ Plugin org.jetbrains.kotlin.native.cocoapods[read blog post]
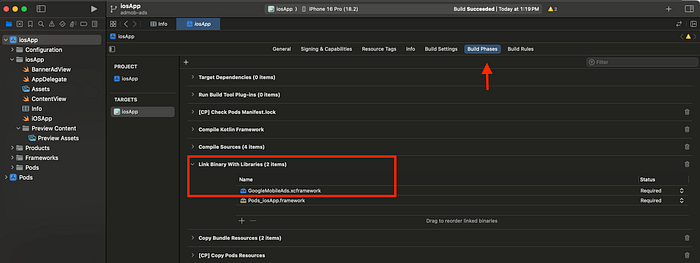
Option 2: Open the file iosApp.xcworkspace (right click open with Xcode). Go to iosApp -> Build Settings -> Link Binary with Libraries -> click add button ‘+’ -> search for GoogleMobileAds.xcframework.
2. iOS Banner Implementation
Create the iOS-specific implementation: code
Now let’s add code the file created AdMobBanner.ios.kt
// iosMain/AdMobBanner.ios.kt
import androidx.compose.foundation.layout.defaultMinSize
import androidx.compose.foundation.layout.fillMaxWidth
import androidx.compose.foundation.layout.height
import androidx.compose.runtime.Composable
import androidx.compose.ui.Modifier
import androidx.compose.ui.unit.dp
import androidx.compose.ui.viewinterop.UIKitInteropProperties
import androidx.compose.ui.viewinterop.UIKitView

@Composable
actual fun AdMobBanner(modifier: Modifier) {
    UIKitView(
        factory = {
            generateIOSBanner().view
        },
        modifier = modifier
            .fillMaxWidth()
            .defaultMinSize(minHeight = 50.dp)
            .height(50.dp),
        update = { },
        properties = UIKitInteropProperties(
            isInteractive = true,
            isNativeAccessibilityEnabled = true
        )
    )
}
3. Configure iOS App
Add the necessary Swift files:
Create a new file AppDelegate.swift and add the code below
// iosApp/AppDelegate.swift
import Foundation
import SwiftUI
import GoogleMobileAds

class AppDelegate: UIResponder, UIApplicationDelegate {
    func application(_ application: UIApplication, didFinishLaunchingWithOptions launchOptions: [UIApplication.LaunchOptionsKey: Any]?) -> Bool {

        // initialize AdMob iOS Ads SDK
        GADMobileAds.sharedInstance().start(completionHandler: nil)

        return true
    }
}
Create the file BannerAdView.swift and add the code below
// iosApp/BannerAdView.swift
import Foundation
import SwiftUI
import GoogleMobileAds
import UIKit
import SwiftUI

struct BannerAdView: UIViewRepresentable {
    func makeUIView(context: Context) -> GADBannerView {

        let bannerView = GADBannerView()
        bannerView.adUnitID = "ca-app-pub-3940256099942544/2435281174" // Replace with your ad unit ID

        if let windowScene = UIApplication.shared.connectedScenes.first as? UIWindowScene,
           let rootViewController = windowScene.windows.first?.rootViewController {
            bannerView.rootViewController = rootViewController
        }

        let request = GADRequest()
        bannerView.load(request)
        return bannerView
    }

    func updateUIView(_ uiView: GADBannerView, context: Context) {}
}
Update ContentView.swift file
// iosApp/ComposeView.swift
import UIKit
import SwiftUI
import ComposeApp
import GoogleMobileAds

struct ComposeView: UIViewControllerRepresentable {
   init() {
          MainViewControllerKt.IOSBanner = {
              let adBannerView = VStack {
                  BannerAdView()
              }
              return UIHostingController(rootView: adBannerView)
          }
      }

    func makeUIViewController(context: Context) -> UIViewController {
        MainViewControllerKt.MainViewController()
    }

    func updateUIViewController(_ uiViewController: UIViewController, context: Context) {}
}

struct ContentView: View {
    var body: some View {
        ComposeView()
                .ignoresSafeArea(.keyboard) // Compose has own keyboard handler
    }
}
Update iOSApp.swift file
// iosApp/iOSApp.swift

import SwiftUI

@main
struct iOSApp: App {
    @UIApplicationDelegateAdaptor(AppDelegate.self) var appDelegate

    var body: some Scene {
        WindowGroup {
            ContentView()
        }
    }
}
3. Update MainViewController
Update the file MainViewController.kt in your iOS main source set:
// iosMain/MainViewController.kt

import androidx.compose.ui.window.ComposeUIViewController
import platform.UIKit.UIViewController

lateinit var IOSBanner: () -> UIViewController

fun generateIOSBanner(): UIViewController {
    return IOSBanner()
}

fun MainViewController() = ComposeUIViewController(
    configure = {
        enforceStrictPlistSanityCheck = false
    }
) {
    App()
}
4. Update Info.plist
Add the required AdMob configuration the AdMob app id and the SKAdNetworkIdentifier.
Update the file Info.plist using Xcode or Android Studio.
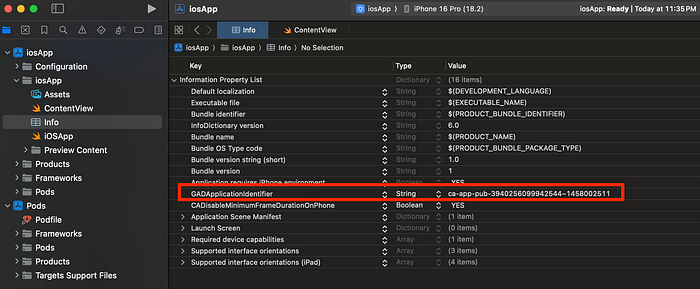
Xcode: Open the file iosApp.xcworkspace (right click open with Xcode) -> Info.plist.
Android Studio: Open the file Info.plist
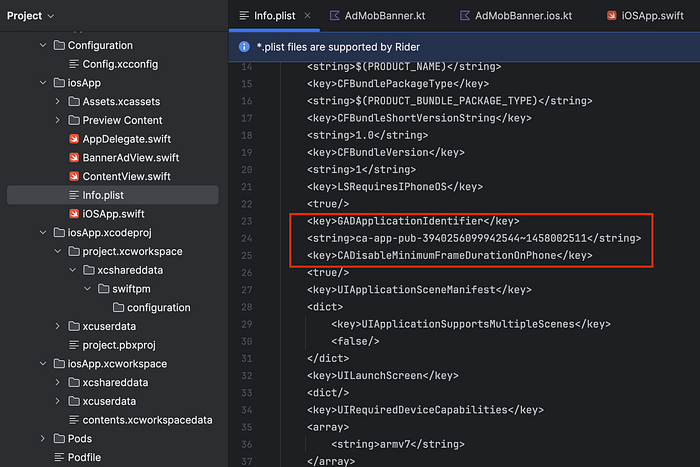
- Add GADApplicationIdentifier key with a string value of your AdMob app ID found in the AdMob UI. Using test admob app id.
<key>GADApplicationIdentifier</key>
<string>ca-app-pub-3940256099942544~1458002511</string>- Add SKAdNetworkItems key with SKAdNetworkIdentifier values for Google (cstr6suwn9.skadnetwork) and select third-party buyers who have provided these values to Google. Complete list of third-party buyers: skadnetwork
<array>
    <dict>
        <key>SKAdNetworkIdentifier</key>
        <string>cstr6suwn9.skadnetwork</string>
    </dict>
    <!-- Add other SKAdNetwork identifiers as needed -->
</array>
Android Implementation
Create an AdMob account https://developers.google.com/admob/android/quick-start
1. Add Gradle Dependencies
First, add the Google AdMob dependency to your Android app’s build.gradle file:
sourceSets {
  androidMain.dependencies {
    implementation("com.google.android.gms:play-services-ads:23.6.0")
     }
}
2. Android Banner Implementation
Create the Android-specific implementation: code
Now let’s add code the file created AdMobBanner.android.kt
// androidMain/AdMobBanner.android.kt
import androidx.compose.foundation.layout.fillMaxWidth
import androidx.compose.runtime.Composable
import androidx.compose.ui.Modifier
import androidx.compose.ui.viewinterop.AndroidView
import com.google.android.gms.ads.AdRequest
import com.google.android.gms.ads.AdSize
import com.google.android.gms.ads.AdView

@Composable
actual fun AdMobBanner(modifier: Modifier) {
    AndroidView(
        modifier = modifier.fillMaxWidth(),
        factory = { context ->
            AdView(context).apply {
                setAdSize(AdSize.FULL_BANNER)
                adUnitId = "ca-app-pub-3940256099942544/9214589741" // Replace with your ad unit ID
                loadAd(AdRequest.Builder().build())
            }
        }
    )
}
2. Update MainActivity
Initialize AdMob in your MainActivity:
class MainActivity : ComponentActivity() {
    override fun onCreate(savedInstanceState: Bundle?) {
        super.onCreate(savedInstanceState)

        MobileAds.initialize(this) // initialize AdMob Android Ads SDK

        setContent {
            App()
        }
    }
}
3. Update Android Manifest
Inside the file AndroidManifext.xml add necessary permissions and metadata:
<uses-permission android:name="android.permission.INTERNET" />
<uses-permission android:name="com.google.android.gms.permission.AD_ID"/>
<application>
<meta-data
android:name="com.google.android.gms.ads.APPLICATION_ID"
android:value="ca-app-pub-3940256099942544~3347511713"/>
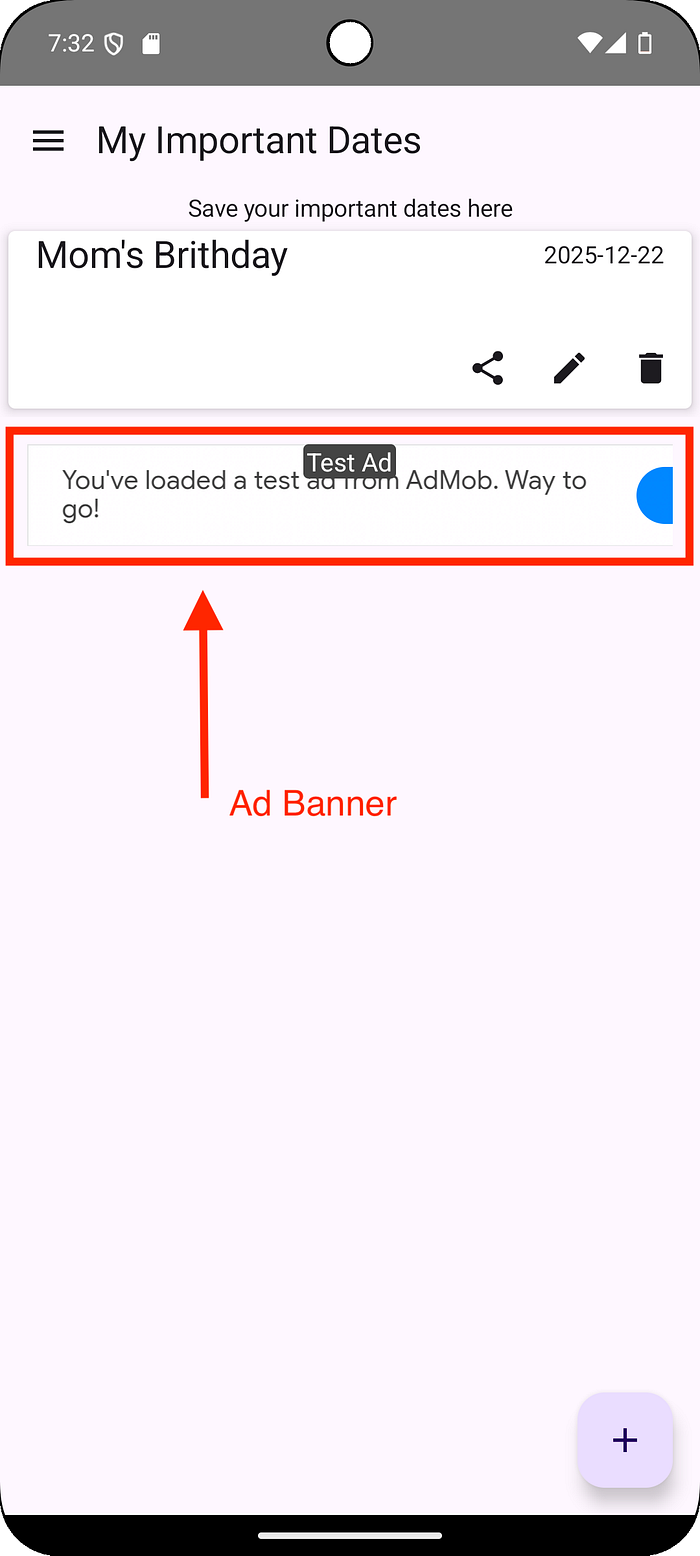
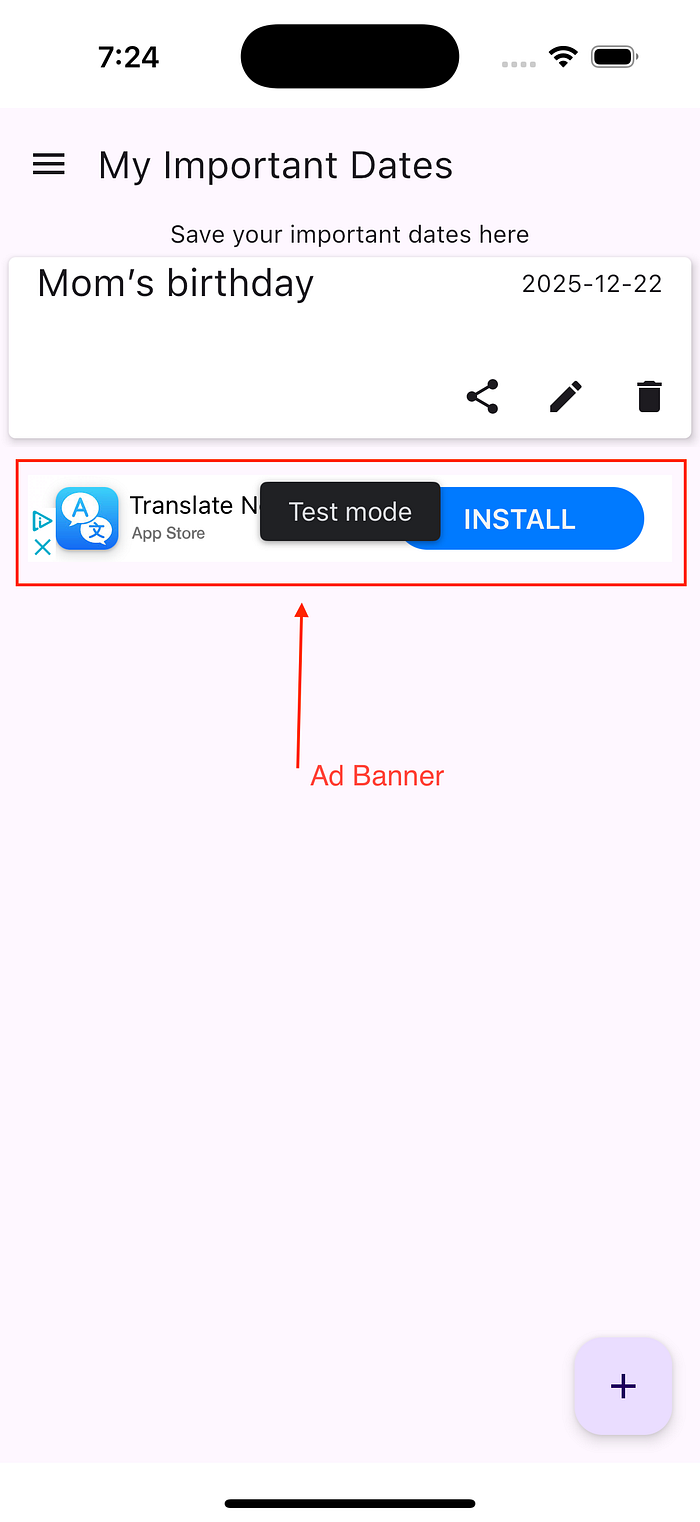
</application>Using the AdMob Banner
Now you can use the shared AdMob banner component in your common Compose code:
@Composable
fun ShowAdBanner() {
        AdMobBanner(modifier = Modifier.fillMaxWidth())
}
Best Practices and Tips
- Test Ads: Always use test ad unit IDs during development to avoid violating AdMob policies.
- Error Handling: Implement proper error handling for ad loading failures.
- Responsive Design: Ensure your banner ads adapt well to different screen sizes.
- Privacy: Follow platform-specific privacy guidelines and implement necessary consent mechanisms.
Common Issues and Solutions
- iOS Simulator Issues: If ads don’t show in the iOS simulator, ensure you’ve properly configured the excluded architectures in your Podfile
- iOS Pods errors:
//Remove the framework from your project
pod deintegrate //if using CocoaPods
pod install //to reinstall dependencies- Android Manifest Conflicts: Make sure your application ID matches the one registered in AdMob
- Layout Problems: Use appropriate modifiers to handle ad container sizing and positioning
Conclusion
Integrating Google AdMob ads into a Kotlin Multiplatform project requires platform-specific implementations but allows for a shared interface in your common code. This approach maintains the benefits of code sharing while leveraging platform-specific ad implementations for optimal performance and user experience.
Remember to replace the test ad unit IDs with your actual AdMob ad unit IDs before releasing your app to production.
Note: The ad unit IDs used in this guide are test IDs. Replace them with your actual AdMob ad unit IDs for production use.
Github Code
Check out the repo and run the sample KMP Ads app code https://github.com/AndreSand/ads-kmp
Production iOS app using the ads code https://apps.apple.com/us/app/myimportantdateskmp/id6736870590?platform=iphone
Thank you for reading
Hope you learn something new. 🙌🙏✌
Don’t forget to clap 👏 50 times to support me and follow me for more such useful articles about Android Development, Gemini AI, Kotlin & KMP.
If you need any help related to Android, Kotlin and KMP. I’m always happy to help you.
- If you enjoyed this, please follow me on Medium
- Buy me a coffee
Follow me on:
Medium, LinkedIn, GitHub, Google developer
Thank you for taking the time to read this. I welcome your feedback on how I can improve or if you have any questions.
— Andres 🙌🏻